

The sewing vs heat transfer decision depends on the garment fabric, attachment process and required care performance. In performance outerwear and occupational workwear manufacturing, selecting a retroreflective material and selecting its application method are inseparable engineering decisions. A high-index reflective trim that exhibits exceptional photometric brightness as a loose roll sample can crease, blister, restrict garment drape, or peel away after a single wash cycle if attached using an incompatible factory process.
If sewing is the chosen method, specify the sew-on style from the reflective piping range; heat-transfer films and webbings follow a different application path.
Garment engineers and sourcing teams primarily choose between two bonding disciplines: Mechanical Sewing (Stitch-On) and Thermal Fusion (Heat Transfer Vinyl / HTV). Neither method is universally superior.
Sewing provides mechanical anchoring across many coarse, textured, or silicone-treated fabrics, but needle penetrations can compromise waterproof membranes and continuous trims can create localized stiffness. Heat transfer avoids needle holes and can produce a flexible bond, but the finished assembly’s water resistance depends on the shell, film and application conditions. It requires control of temperature, pressure and dwell time; compatibility with water-repellent shell finishes must be checked.
Evaluating these trade-offs requires dissecting the interfacial physics of each bonding method, their factory processing windows, and their root-cause failure mechanisms.
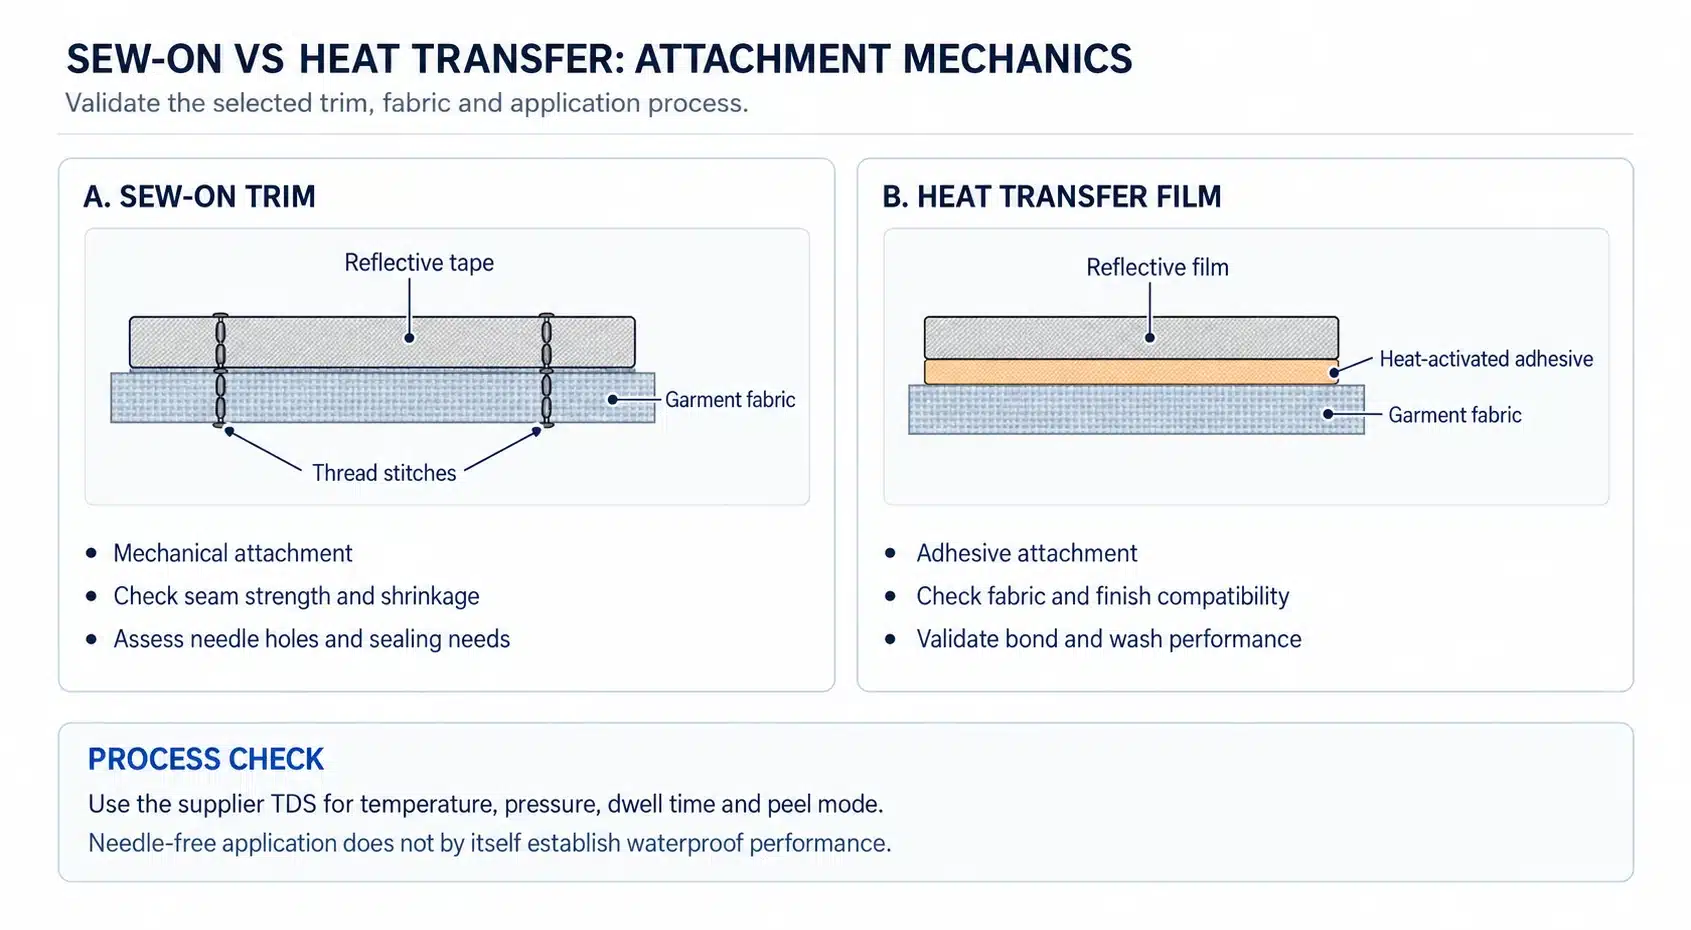
Mechanical Sew-On Tape: Puncture Anchoring & Structural Tolerance
Mechanical stitching is the traditional foundation of heavy-duty industrial workwear.
Bonding Principle & Micro-Mechanics
Sew-on trims consist of a retroreflective layer bonded to a textile carrier fabric (such as 100% polyester, 65/35 poly-cotton TC twill, or inherently flame-resistant aramid).
- The tape is secured to the garment shell using synchronized industrial lockstitch or chainstitch sewing machines.
- Mechanical Thread Loops: Steel needles pierce through both the reflective trim and the garment shell, looping needle and bobbin threads together. Seam strength depends on the sewing thread (examples include 40/2 or 30/3 polyester or spun aramid), stitch construction, needle damage and the tear resistance of the host fabric.
Primary Engineering Advantages
- Broad Substrate Compatibility: Stitching does not depend on chemical surface energy or polymer compatibility. It can be used on coarse wool, high-pile fleece, rough Cordura® nylon, silicone-coated fabrics and open-mesh vests where adhesive wetting may be difficult, provided the stitch construction and substrate are suitable.
- Extreme Shear and Peel Resistance: A dual-row lockstitch seam provides mechanical restraint; resistance to snagging, abrasion and industrial laundering depends on the thread, trim, shell and tested seam construction.
- No Heat-Press Exposure: Sensitive garment fabrics (such as lightweight nylon taffeta or low-melting-point synthetics) that would melt or scorch under a 160°C heat press can be stitched at ambient room temperature.
Primary Engineering Vulnerabilities
- Needle Holes in Waterproof Membranes: Every needle penetration creates a permanent micro-puncture through the garment’s waterproof/breathable membrane (e.g., Gore-Tex®, Sympatex®, or microporous PU coatings). To maintain hydrostatic water resistance, the garment factory may need a compatible seam-sealing operation. 3-layer hot-melt seam-sealing tape applied over the back of the stitch line with suitable hot-air equipment is one option; the tape and process must match the shell construction.
- The “Cardboard / Armor Plate” Effect: A non-stretch continuous 50 mm woven reflective tape can restrict lateral or diagonal extension. When stitched onto lightweight stretch knits or performance athletic tops, it can create a restrictive band and change garment drape.

Thermal Heat Transfer Film (HTV): Chemical Fusion & Seamless Ergonomics
Heat transfer retroreflective film (HTV)—available in continuous solid rolls, custom plotter-cut logos, and perforated segmented patterns—represents the modern benchmark for athletic wear, technical outerwear, and modern ergonomic workwear.
Bonding Principle & Micro-Mechanics
Many reflective heat transfer films use glass-bead optics with a heat-activated adhesive and a removable application liner, which may be polyester PET or another material. Adhesive chemistry and liner construction depend on the film grade.
- Under the simultaneous application of controlled heat and pneumatic pressure, the hot-melt adhesive undergoes a phase change, transitioning from a solid state into a low-viscosity molten liquid.
- The molten polymer flows into the interstitial voids between the individual textile yarns of the garment shell, encapsulating the fibers.
- As the platen lifts and the bond cools, the adhesive solidifies and develops adhesion to the textile. The bonding mechanism and any later conditioning requirement depend on the adhesive system.
Primary Engineering Advantages
- Zero Needle Punctures: Surface application avoids stitching holes. It does not by itself establish waterproof performance: heat exposure, adhesive compatibility and the finished shell assembly still require validation.
- Dynamic 4-Way Elasticity & Comfort: Suitable segmented heat transfer films (such as chevrons, broken dashed lines, or hex patterns) can accommodate extension on activewear knits. Stretch, recovery and comfort depend on the selected film, pattern and fabric.
- Moisture Vapor Permeability: Gaps between reflective segments leave some shell area uncovered and can reduce the covered area compared with solid tape. Finished-garment breathability still depends on the shell and trim layout.
Primary Engineering Vulnerabilities
- Process window: heat, pressure, dwell and peel mode must match the film TDS and the actual shell. A setting that works on one fabric can scorch, under-bond or leave edge lift on another.
- Finish sensitivity: C0 or other DWR finishes, silicone and some print coatings can block wetting. A dyne-pen reading alone is not an acceptance test; validate adhesion on the finished fabric.
- Texture and heat limits: deep textures, open meshes and low-melting shells may not take a complete bond, or may be damaged by the press temperature.
- Repair and rework: a failed transfer is often harder to salvage than a sewn seam; plan a destructive-test coupon and a defined reject action.
- Evidence: appearance after pressing does not establish wash, stretch-recovery or waterproof performance. Keep a retained panel and run the agreed care trial, including any required conditioning time.
These are process risks to check, not a ranking that heat transfer is “worse” than sewing.

The 3 Pillars of the HTV Application Process Window
Machine calibration is an important contributor to heat transfer consistency. Validate the Three Pillars of Thermal Lamination for the exact film, fabric and machine. The ranges below are illustrative factory-trial values, not a universal recipe or an ISO requirement. Use the selected supplier’s technical data sheet (TDS). 3M’s transfer-film data sheet illustrates why application conditions must be matched to the individual film and substrate.
Illustrative process window — confirm against the selected film TDS
- Temperature
- 140°C–160°C example range, measured at the application interface.
- Pressure
- 3.5–4.5 kgf/cm² example setting. A machine gauge reading is not automatically the contact pressure at the adhesive.
- Dwell time
- 12–15 seconds example cycle.
- Peeling mode
- For a specified cold-peel film, cool to the required condition. Below 35°C is an example criterion; other films require warm or hot peeling.
The Physics of Peeling: Why the Specified Peel Mode Matters
For a film specified for cold peeling, removing the application liner while the garment is still hot can cause problems:
- Immediately after pressing, the adhesive may remain in a softened state with low internal cohesive strength.
- Peeling before a cold-peel system has developed sufficient bond strength can lift edges or disturb the adhesive interface.
- A disturbed bond may later show edge curl or delamination during washing.
- Factory Rule: Follow the film manufacturer’s specified cold, warm or hot peel procedure. For a cold-peel grade, allow the panel to reach the stated cooling condition before removing the liner.
The DWR Chemical Barrier: Overcoming Fluorocarbon-Free (C0) Water Repellents
The industry-wide transition toward eco-friendly, fluorocarbon-free (C0) Durable Water Repellents (DWR)—utilizing silicone, paraffin, or dendritic wax chemistries—has created major adhesion challenges for heat transfer films.
The Low Surface Energy Problem
DWR finishes work by lowering the surface energy of garment fibers so that water droplets resist spreading and tend to bead and roll off. However, these same finishes prevent hot-melt adhesives from spreading and wetting out the fibers:
Technical Note on Surface Screening: ASTM D2578 measures wetting tension on polyethylene and polypropylene films. Its scope does not establish a universal dyne-pen acceptance test for porous or coated garment fabrics. Thresholds such as 38 dynes/cm or 36 dynes/cm must not be treated as automatic pass/fail limits for reflective transfers. Check the finish with the shell and adhesive suppliers, then assess adhesion and laundering on the actual fabric-film combination. ASTM D2578 scope.
Factory Solutions for Low-Dyne Fabrics
- Adhesion Promoter Primers: Consider a primer only if the film and shell suppliers approve it for that exact combination. Validate adhesion, appearance and water-repellent performance; do not assume a polyolefin primer is suitable for a coated textile.
- Mechanical Pre-Press: Where the film and shell instructions allow it, a pre-press can remove moisture or wrinkles. A 5-second pre-press at 150°C is a trial example, not a proven treatment for all DWR finishes.
- Switch to Mechanical Stitching: If a validated transfer process cannot give acceptable adhesion on a silicone-treated or other difficult shell, consider a suitable sew-on trim and assess the seam and any waterproofing requirements.
Sewing vs Heat Transfer: Technical Comparison Matrix
The cycle counts and second-counts above are grade- or process-specific examples for planning. They are not MAXREFLECT guaranteed wash life or standard minutes. Replace them with the selected product’s report and the factory’s approved process sheet before costing or labeling.
| Evaluation Parameter | Mechanical Sew-On Tape | Thermal Heat Transfer Film (HTV) |
|---|---|---|
| Bonding Mechanism | Mechanical needle thread loops | Polyurethane hot-melt fusion & fiber wetting |
| Waterproof Integrity | Needle holes may require compatible seam sealing | No needle perforations; validate finished assembly water resistance |
| Fabric Hand & Drape | Stiff band; can cause skin chafing on knits | Can be soft and flexible; depends on film and pattern |
| Stretch Compatibility | Depends on the carrier and construction: a rigid woven tape can restrict movement, while an elastic sew-on piping or a stretch carrier may behave differently — trial the actual stack. | Grade-, pattern- and fabric-dependent; segmented layouts can help |
| Rough Substrate Tolerance | Often suitable with an appropriate seam and needle | Poor on deep textures (creates incomplete glue bridges) |
| DWR Finish Sensitivity | Does not rely on adhesive wetting; validate stitch quality | Potential adhesion difficulty; validate the actual finished fabric |
| Factory Equipment Needed | Twin-needle lockstitch sewing machines | Calibrated pneumatic flatbed heat presses |
| Typical Wash Longevity | Example grade target: up to 50 industrial cycles; verify ISO 15797 procedure and result | Example grade target: 25–50 domestic cycles at 60°C; verify ISO 6330 procedure and result |
| Cycle Time per Garment | Example: 15–25 seconds per panel; operation-dependent | Example: 12–15 seconds dwell plus handling; follow film TDS |
ISO 6330 specifies domestic washing and drying test procedures; ISO 15797 specifies industrial test procedures for workwear. Neither assigns every sew-on or transfer product a fixed service life or supplies a heat-press recipe. The cycle counts above are grade-specific examples to verify against the selected product’s report.
Factory SOP: Controlling a Heat Transfer Run
Use the following SOP structure beside the heat press after validating it for the selected film, shell and machine. The numerical values are examples to be confirmed in the approved process sheet; they do not guarantee zero delamination.
Heat transfer production application SOP — adapt after validation
-
Substrate preparation
- Confirm fabric finish compatibility on actual samples. A dyne-pen value alone is not an acceptance test for textiles.
- Where approved, pre-press for 3–5 seconds to remove moisture and wrinkles.
-
Machine calibration
- Measure platen/interface temperature with a suitable contact sensor. The example 145°C–155°C range must match the film TDS.
- Confirm the pressure definition and uniformity. The example 3.5–4.5 kgf/cm² gauge setting is machine-dependent.
- Use the approved dwell time; 12–15 seconds is an example, not a universal setting.
-
Heat press execution
- Position the film with its adhesive side against the fabric shell.
- Use a clean protective release sheet, such as PTFE (Teflon), only where the supplier’s instructions specify it.
- Run the cycle with the platen flat and the load evenly supported.
-
Cooling and peeling
- Move the panel flat to the required cooling surface.
- For an approved cold-peel process, wait for the specified condition; below 35°C is the example shown here.
- Remove the carrier smoothly at the supplier’s prescribed angle. Use 180° only when that film’s instructions call for it.
-
Quality audit
- Inspect the edges and adhesive interface for the agreed appearance and adhesion criteria.
- A fingernail edge check is only a quick screen; confirm performance with the specified adhesion and wash tests.
- Where required by the film TDS, condition for 24 hours before testing. An initial 3-cycle wash check is a screening step, not evidence of the full claimed wash life.
Frequently Asked Questions
Can reflective heat transfer film be washed immediately after pressing?
Follow the film TDS for any required conditioning or waiting time before wash or wear. Immediate washing can be a process risk, not a universal rule. Record the actual wait time used on the approved trial.
Why does sew-on reflective tape cause puckering along the seam after washing?
Differential shrinkage, a tight stitch, or a rigid carrier can gather the shell. Trial the actual stack, including an elastic sew-on construction if stretch is required, and do not assume that every sew-on tape will pucker — or that every sew-on tape is rigid.
What is the advantage of segmented heat transfer film over continuous solid tape?
A segmented layout can improve flexibility and moisture-vapor passage on some garments, but only after a stretch-and-recovery and care trial on the finished fabric. The pattern does not by itself establish wash life or a garment class.
How can a factory verify that a heat press is delivering uniform pressure across its platen?
Use the press manufacturer’s verification method and a defined coupon test (for example pressure-sensitive film or a retained bond trial at several platen locations). Record the settings that produced the approved bond; appearance after a single center press is not enough.
When should a factory sew reflective piping instead of using heat transfer film?
Sew when the trim must be caught in a seam or along a bound edge, when the shell will not accept the required heat or adhesive (including some DWR, silicone or heat-sensitive fabrics), or when the approved construction is a corded or flanged piping. Use heat transfer when the design is a surface graphic, a segmented motif, or another application defined by the film TDS — and only after a bond and care trial on the finished fabric. Choose the method from the approved sample, not from a photograph of another product family.


Related blogs
Custom Reflective Accessories RFQ Guide: 8 Technical Specs Suppliers Need Before Quoting
Custom Printed Reflective Tape
Custom Reflective Gear: Sew-On vs. Heat Transfer & The OEM Process
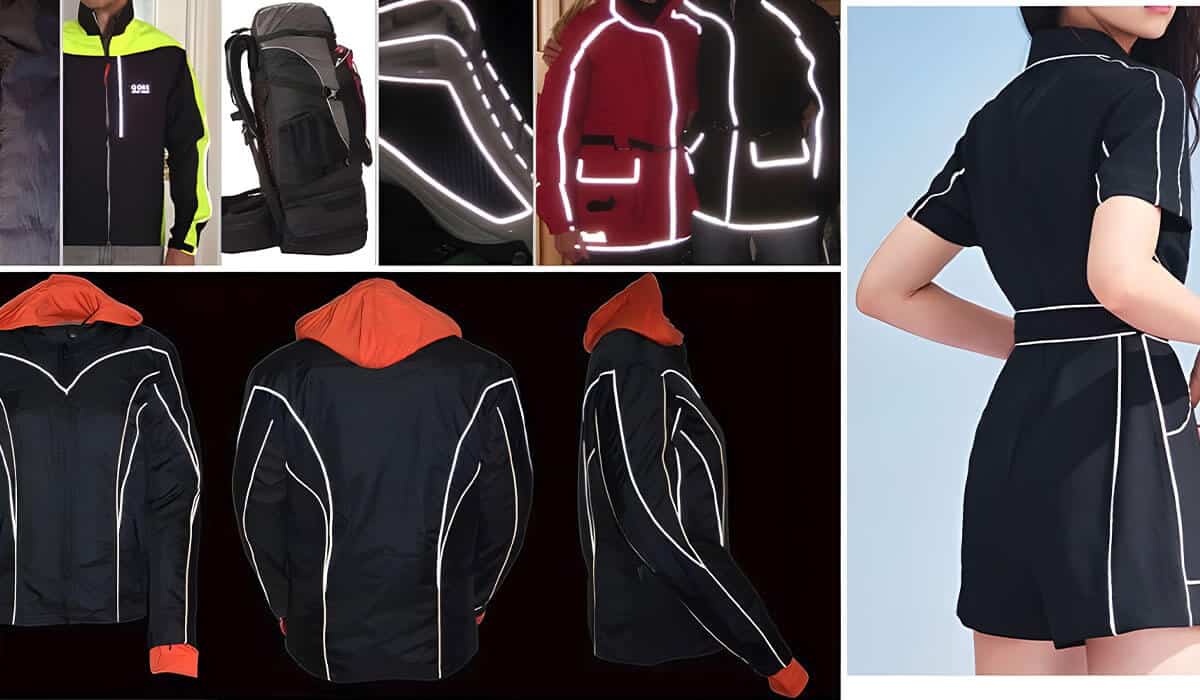
Reflective Piping for Clothing
Related products

Reflective piping

Reflective ribbon tape
Reflective Ribbon Tape Stitched


